Scheduling a Zoom meeting
In previous posts, we have talked about how to join a meeting and how to troubleshoot going to the meeting. In this post, we are going to discuss some basics on how to schedule a meeting.
You need a Zoom account in order to do this, but it can be a free one. You also need to be signed into it wherever you are scheduling it:
You can either open the Zoom app and click schedule a meeting. Or you can go to zoom.us and click on My Account on the top right and then click Schedule a Meeting.
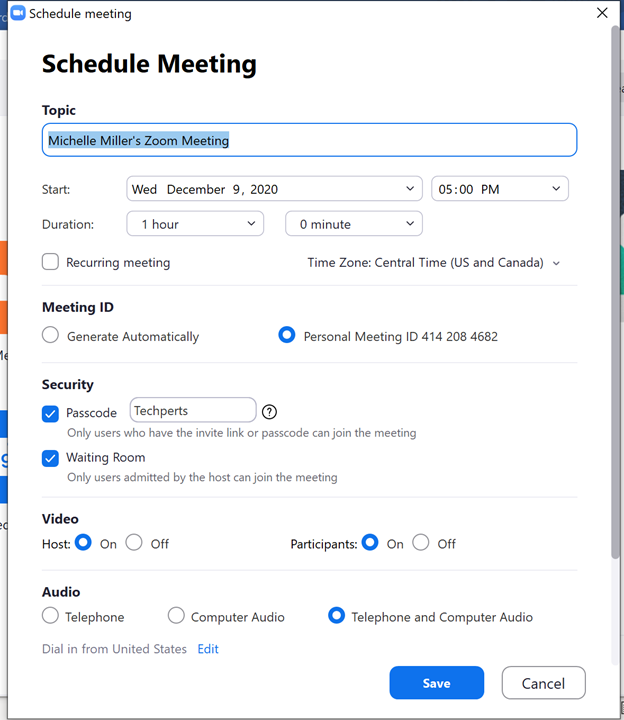
This is the picture from the Zoom app, but the one on the zoom.us page has the same information.
At the very least, you want to make sure to adjust the time and date for when you want the meeting to be. This is how participants can verify the meeting time, especially when you have participants from different time zones. You can see on the above meeting that the time will be in CST because Central Time (US and Canada) is selected. Then you can hit save, and you’ve scheduled your meeting.
But let’s go into a little more detail about this screen…
I can select recurring meeting if I am going to have the meeting again. On zoom.us, you have more control over this, and you can select how often it recurs and for how long. There is also the option for no fixed time, which is the default in the app. “No fixed time” means that you can just let people know when it will be. You’ll be able to start it whenever.
Personal meeting ID vs. generate meeting ID automatically
It’s also possible to use your personal meeting ID or to generate a meeting ID automatically. Let’s talk a little bit about the differences:
Generating a meeting ID automatically gives you a random meeting ID. You can customize the password. Having different meeting IDs for every meeting that you have means that there is no risk of participants bumping into each other. So this is the method I use for personal meetings.
Using a personal meeting ID uses the same meeting ID every time you use it. From meeting to meeting, the meeting ID and password shouldn’t change.* Having the same meeting ID for multiple meetings means that people from different meetings can bump into each other. For people who struggle to get into Zoom, keeping the meeting ID and password the same can be easier to get into. Using a personal meeting ID or a recurring meeting without a fixed time can provide this same functionality. I’ve often seen people use their personal meeting ID for office hours or for recurring meetings.
*You can customize your personal meeting ID (e.g., phone number) and password, which can be a good method of branding. Keep in mind that if you change the password or meeting ID, you will change it for all meetings that use your personal meeting ID. So if you change the password or meeting ID of your personal meeting room, you’ll have to let people you’ve already scheduled with on that room that you’ve done that. However, doing so is a good way to get rid of Zoom bombers if your personal meeting room has been hacked.
If you want custom passcodes for different meeting rooms, I highly recommend setting up the recurring meeting with “no fixed time”. That way, they will not interfere with one another.
Security
Now let’s talk security. Security requires there to be a passcode on every meeting. Zoom passcodes will automatically be a series of numbers. You can customize the passcode to make it easier for people to type. If you have a personal meeting ID, we don’t recommend changing it from meeting to meeting (see * above for why).
You can also turn on or off a waiting room. If you are in the meeting room and the waiting room is off, anyone who has the passcode and meeting ID can walk right in. This may be the right atmosphere for an office hour or a large event. However, for most things, for security, I recommend a waiting room, especially if you use your personal meeting ID for all your meetings. Most event organizers will keep the waiting room on to make sure that the participants are who they are supposed to be. This is especially true when ticketing (though some people won’t be named correctly so check). This is also super helpful if you want to wait to let the participants in because you want to chat with e.g., the organizers ahead of time.
Video and Audio
Having the video on or off can set the tone for the meeting – how much participation you expect from participants. I tend to set it as on, especially for one-on-one meetings. However, if you are doing a webinar, you may prefer to set it as off.
I always select Telephone & Computer Audio. This provides the most flexibility for participants. However, if you need people to use their phones or their computers, you can set it accordingly.
The calendar option only shows up on the app – not on zoom.us. What it does is shows you where it will put the meeting information. I usually use zoom.us because I don’t have these set up. However, this can be a great way of integrating with other software that you use.
Let’s talk briefly about the Advanced options on the app and Meeting options on zoom.us because they are mostly the same.
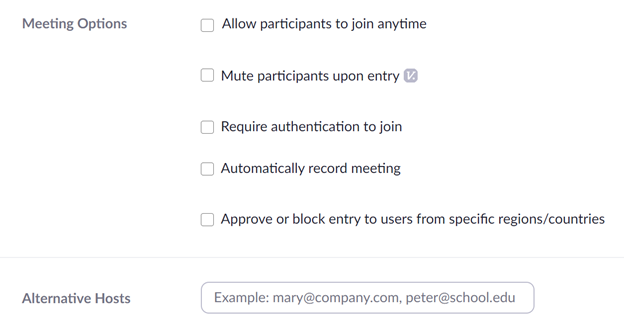
If you let participants to join anytime, they will join the meeting immediately if you don’t have a waiting room and join the waiting room if you do. For security’s sake, I don’t recommend the first option. However, the second option can be a good plan in some circumstances. For a recurring meeting without a fixed time, I usually have this on with a waiting room on. That way people can join whenever and I can let them in whenever. If people get confused about timing, keeping this off can be a good way to remind them of when the meeting is.
Muting participants upon entry is a good way to let people know what the expectations for participation are. Most people will chitchat when they first get in, unless they are muted. If people don’t know how to mute themselves, this can be a good way to automate it.
Requiring authentication to join can be a way of improving security because it requires signing into Zoom. However, if you have individuals who are not tech-savvy attending, I don’t recommend it because it can mean that they can’t get in. So I always leave that unchecked.
You can also automatically record meetings and set an alternative host. Note that the alternative host must have a Zoom account.
If you are on the app, you will now have an e-mail or a calendar event. You can send it.
If you are on zoom.us, you will now have meeting info. You can edit it if you typed something wrong. At this point though, I usually hit “Copy invitation” and send it off to the participants.
About sending out invitations
Sometimes e-mails go to spam, or people don’t check their e-mails. If you have someone you really want to be at your meeting, it’s a good idea to confirm with them that they got the e-mail. It can also be a good idea to offer a Zoom testing session, especially if you are offering a paid session or if someone will struggle with Zoom. For paid sessions, this is often a group session, but I have done it one-to-one with family members.
Hopefully you gained more knowledge on the setup of a zoom meeting and what to check and what it all means. If you have questions or need help scheduling zoom meetings, call Tech Lab at 414-208-4682.