Mozilla Thunderbird Setup (mail1)
- Download Mozilla Thunderbird and install it on your computer if you don’t already have it.
- Open Thunderbird.
- When using Thunderbird for the first time, if the wizard opens, click Use My Exisitng Email Account button at the bottom and goto step 6.
- Alternatively, if you don’t see the wizard or you have previously set up Thunderbird for another account, try:
- Try clicking the 3 Lines in the upper right corner and choose Options then Account Settings.
- On Mac click the Tools menu then Account Settings
- On Windows, sometimes you can press the Right ALT key to show the menu (top left), then click the Tools menu then Account Settings
- At the bottom of the left column, click on Account Actions then Add Mail Account…
- Type your first and last name, email address, and email password and click Continue.
- Next choose Manual Config.
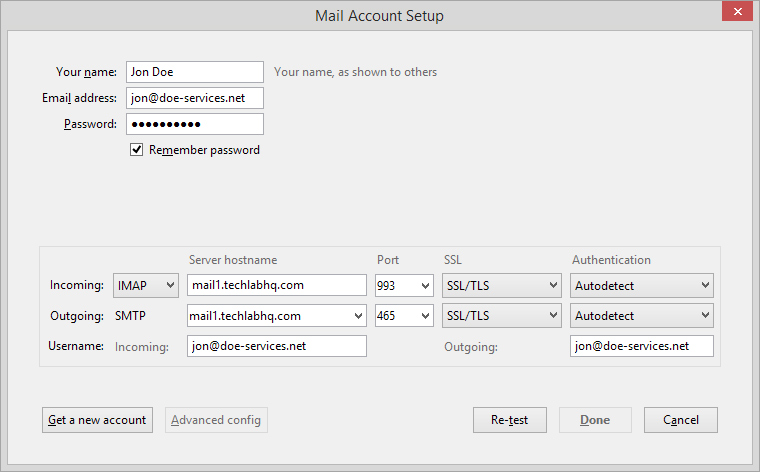
- For Incoming, choose IMAP
- Server hostname: mail1.techlabhq.com
- Port: 993
- SSL: SSL/TLS
- Authentication: Autodetect
- For Outgoing: SMTP
- Server hostname: mail1.techlabhq.com
- Port: 465
- SSL: SSL/TLS
- Authentication: Autodetect
- Username: Incoming: you@your-website.com
- Type your entire email address, not just the first part, it needs your complete email address.
- Username: Outgoing: you@your-website.com
- Your email gets copied from the Incoming field (after you type the incoming, outgoing auto-updates) if they are not identical, correct the outgoing so that it’s the same as the incoming field.
- Your screen should look similar to this image.

- Click Re-test.
- Click Done.
- Click OK (if needed).
- Click on your Inbox (in the left column) and start using Thunderbird.
We also recommend enabling Junk filtering in Thunderbird.
- Go back into Account Settings
- Try clicking the 3 Lines in the upper right corner and choose Options then Account Settings.
- On Mac click the Tools menu then Account Settings
- On Windows, sometimes you can press the Right ALT key to show the menu (top left), then click the Tools menu then Account Settings
- In the left column, click on Junk Settings
- In the right column, under Destination and Retention (at the bottom), checkmark the box for Move New Junk Messages To:
- The Junk folder on your account is selected automatically. Leave the other options alone.
- Click OK.
- Go into Thunderbird Options.
- Try clicking the 3 Lines in the upper right corner and choose Options then Options again.
- On Mac click the Tools menu then Account Settings
- On Windows, sometimes you can press the Right ALT key to show the menu (top left), then click the Tools menu then Account Settings
- Click on the picture of the lock for Security.
- You should now be looking at the Junk sub-tab (nothing to click in this step).
- Checkmark the box for When I Mark Messages as Junk:
- Choose the option to Move Them To The Account’s Junk Folder if it’s not already picked.
- Click OK.
You can also access your email account online from anywhere, use http://webmail.your-website.com as the link (replace your-website.com with the website name you host with us). For example:
- http://webmail.techlabhq.com
- http://webmail.iotainteractive.com
- http://webmail.yoursite.net
- http://webmail.yourdomain.us
- etc…